
Movie Room Remodel Reveal
It’s official! We’re finished with the movie room. Or at least, finished for now. Truth be told, most of the work was done towards the end of last year, but all the finishing touches took some time. Instead of posting a play-by-play like we did with the big bathroom remodel, this time around we thought it would be fun to do one big reveal.

Enter if you dare.

Designing the Movie Room
This basement movie room was meant to be bright and airy, yet warm and inviting. And 100% comfortable. We achieved this balance through our color choices and by layering textures. 1.) We used a lot of white, light blue and grey with splashes of mint. 2.) We contrasted the brightness with warm wood and gold tones for the metallic finishes. 3). Lastly, we brought in a lot of fabrics for warmth and texture. Basically, we wanted it to feel like you’re not actually in a basement. We also tried to bring the lake vibe indoors without being overtly themey/cheesy and nautical. We wanted it to be polished and clean feeling, but still playful. Hopefully this space will be the entertaining hub for both movie nights and sports parties, as well as game nights and get-togethers. Here’s a little video tour:
Before and After Photos
The finished product didn’t happen overnight, so if there are certain things you’d like us to post about in-depth, we’d be happy to tackle questions about specific projects within the room. For now, we’re laying some before-and-after pictures on you and we’ll hopefully ‘unpack’ the elements of the room in future posts. It’s fun to see these transformations!


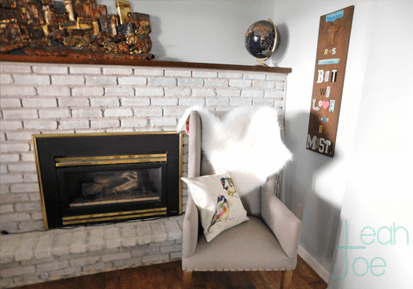
Real life time out: I really wanted this chair, but Joe hates it. I think it looks so pretty, but Joe says it looks like something for show that nobody would actually want to use. That got me thinking back to our values and intentions for the room: Comfortable and inviting were two. It might be polished, but it’s also something I would totally get too precious about, and not want it to get dirty. That’s just not how I want to live. So it’s going back to the store. But never fear, I found a better chair.


Leather Chair
There’s our forever chair in the corner. Sigh. After much deliberating over the first chair I brought home, I was worried Joe would not be too pleased about finding this guy in the basement when he got home late from work one day. I waited patiently for him to go downstairs to shower, and was on pins and needles listening for any reaction to spotting my latest find. Crickets…

So I went to bed and the next day I texted him saying, “Hey, you didn’t say anything about that chair downstairs. What do you think?” He actually fell asleep in it after work it was so comfortable! He was out like a light. When he asked me where it was from, I got even more excited. I told him I’d scored it for $10 at a neighbor’s yard sale (Shoutout to Paula)! It totally adds warmth and pulls out the orange tones in the floor and ceiling beams. I also see now that this was what was missing: something old. I love that it’s well-worn; it instantly injects life and personality to the space. I’d say it gets Joe’s stamps of approval.
Bookshelves
I think you know all about our DIY built-in bookshelves and my love affair with them.

The clock above is a $30 score from Home Goods. The mirrors help bring in light and its scale helps the space feel bigger. Subtle thing: All the lines in the room (i.e.: curtains, floor and ceiling beams) run lengthwise to lead the eye the long way of the room, if that makes sense. Then the clock anchors you at the end of the room.

I bet you don’t know the story behind this thing though. Our little DIY built-in media center storage was a real pain. I may detail all the steps in a future post, but for now I’ll tell you this: The doors used to be attached to a small cabinet. We found it on Facebook marketplace from a guy who said the doors were broken. Perfect – the doors were all we needed! We had to open up the wall to store the audio and electrical stuff for the entertainment system there. And we needed to either keep it open or find something glass so the remotes would still be able to send radio waves or zap through (don’t ask me the technical details please.) But we were able to repurpose these doors.

Another fun detail I added were these photos on the wall. It’s going to be our fishing wall with people’s best catches. It’s a fun little surprise you can see coming out of the bathroom, but not super obvious otherwise. (Joe says I’m cluttering the walls too much, pshhhh).


And we’d be remiss not to show off Joe’s handiwork with the LED lights.
Seating Area
If you’re interested in how we painted the walls, did the trim work, and installed the floor, this post is going to help you out.

The couch (actually couch + love seat) is from my aunt – thanks Auntie K! It fits perfectly in the space and is working out great. We might eventually get some sort of grey fabric couch or sectional for down here. But for now, it’s doing a great job for us!

The DIY faux wood ceiling beams are another feature that adds some character and a feeling of age to the room. (That’s another great way to add dimension and layers.) We even beat them up a little bit. So much fun. They were quite easy and also serve a purpose, which you can learn all about in our trio of DIY wood beams posts: Making, Install, Finishing.

The rug is my baby. I adore it, and so does everyone else who touches it. It’s so soft and comfy. I knew the style I wanted and ordered it from Wayfair. I didn’t have the best experience picking a rug online for upstairs, but this time around we are totally happy with the choice. It was a very reasonable price for such a large area rug. We love that it’s super soft and has a high pile. It’s easy to vacuum. No stains so far, fingers crossed!

I repurposed an old coffee table from one of Joe’s co-workers that you can read all about right here.

The curtains might require their own post after much deliberating over them. In a nutshell, I wanted to have a little fun with the curtains and add a dash of color to the space. To me, horizontal stripes are 100% a neutral. They go with anything – floral prints, solids, whatever. I wear stripes all the time with everything. Stripes are the new black, in my book. So don’t be afraid to go out on a limb when you’ve got multiple patterns at play. Adding a stripe won’t compete for attention. These are actually a kid’s brand from Target called Pillowfort. We needed light blocking curtain panels (for watching movies, obviously.) I tried a few styles, and decided to be a little playful. We can always go with boring curtains later on 😉
You can read about how to whitewash a brick fireplace, if that speaks to your heart. It’s such an easy project that adds mega impact. That amazing bronze cityscape above the mantle is a piece from one of Joe’s dad’s old coworkers I believe. He welds a bunch of things, and this is a skyline of Minneapolis. It is perfect in every way.
Art
Which leads us to art. We’re probably always going to be rearranging and adding to this category, but here’s what we’ve got for now. Now that I think of it, I really could use a few more girly pillows down there.

You might remember this rug I turned into some wall art real quick like. A very fun way to create your own wall hanging on a budget. It adds another element of warmth and texture.

We also did up these candlesticks ourselves. This could warrant posting about too. What do you think?

This is the very first sign I made, and decided to keep it for ourselves. It’s a super cool way to reuse old license plates, and you could spell out just about any saying.

I was excited to whip out my scratch-off world map. Every time you visit a country, you get to scratch it off on the map! It totally goes with our gold finishes. I found a gold frame at the thrift store – they always have plenty. (We also spray painted the curtain rods above gold to match everything.) We’ve got plenty of traveling left to do!

I also found this blue and gold globe at a thrift store to continue the theme.


We have a couple more nods to the world on the bookshelves.

Above the couch is another handmade sign. It’s probably 6 or 7 feel long, spanning the entire seating area. Again, don’t be wimpy when it comes to wall art. Sometimes it can be scary, but I promise having a few big statement pieces will be so much better than a bunch of small things randomly hanging out.
 And don’t forget our DIY barn door. We’ve got a whole tutorial on how to go about making one. It’s the very first thing we did to the downstairs movie room.

And now it’s movie time.
Staging Tips
Just a couple of fun things I did for the photo shoot. Added a plant – always a good idea. This one was borrowed from upstairs, although buying fresh flowers is ideal.

And we added a few other things to make the room look more lived in and not stale, like the coffee cup, scrabble game and a pair of slippers. It’s a funny thing, cleaning and then adding a little mess into the mix.

Throw pillows are also always a good idea. I’m still pining for this chair a little bit :'(

One last thing we might do is add a runner for coming in and out. It would be great for foot traffic from the walk-out to the bathroom. I just stole this one from the kitchen. Still not sure if it looks good, but we definitely need something there for feet in the summer.

Calling it a Day
If you’re still with us at this point, we’re going to call this room done. It turned out better than either Joe or I thought. We had so much fun adding to it over time and creating this great space. Ah, I feel like I’m introduced the cast of a play, or the musicians in a jazz ensemble. Let’s have a round of applause for Leather Chair in the corner there, milk paint Table front and center, that’s Big Rug layin’ out and Ol’ Beams up top. Give it up for the stars of the show… Just me? Probably. We really couldn’t have put it all together without each piece of the puzzle. And I feel like I’m probably forgetting something. Obviously the bookshelves were my favorite thing, but I love the whole room. Much easier than the bathroom. Hope you enjoyed it too!