 Onto Phase Two

There was a lot of good grunt work that went into this one, but it went pretty smoothly once we got our process down.
We couldn’t be happier with how the whole bathroom turned out!

Here’s the sneak peek from Phase One of planning and buying materials before diving in. We decided to do this project one morning, and knocked it out all in one drizzly Sunday afternoon. (Minus a second coat of paint and touchups the next day.)
Divide and Conquer
Joe did tile…

while I painted.

First, we cleared the countertops and shower shelves. Then we took down the mirror, shower rod and curtain, towel racks, and unhinged the door.

And then, taped off all of the edging, fixtures and ceiling with painter’s tape. A tedious job, but definitely helpful in the long run when using an angled brush in little nooks and crannies in a small space like this.
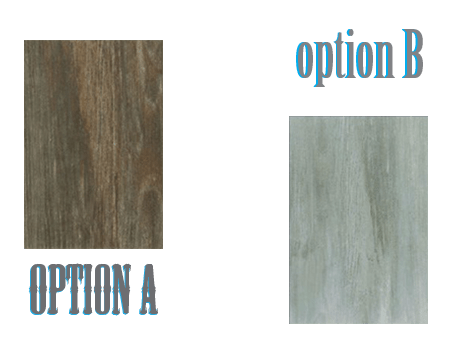
In case you’re still wondering which ceramic tile we chose, we went with option B, the Weathered Birch. In general, I really like the worn/reclaimed beachy driftwood look. Joe is more into dark wood and especially cherry.
We liked both, but had a feeling B would look best in the bathroom. It goes well with the blue, and looks like a north shore beach to me. It has dark brown in it too, bringing out the best of light and dark in the floor and countertop.
I think wood-grain ceramic tile is my new favorite thing!
Here’s roughly Joe’s process:


We first bought a cheap little 14″ tile cutter that Joe returned to the store shortly after purchasing. It was basically the score and snap method, but just didn’t have the juice for the job.
He remembered seeing one at Home Depot, so he used the $20 and applied it toward this mid-range tile saw. Way better! For $79, this was the best option for us. Tile cutters range from $15-$300+ from what we’ve seen. This being our first tile job, we wanted to do a good job without going all out. Likely, there will be more tiling in our future and we may upgrade when that time comes. For now, this one did the trick.
Joe especially likes the water pump. It liquifies all of the tile dust into a mud, so there aren’t microscopic shards of ceramic flying everywhere (i.e. into his lungs).

He’d saw a piece, apply, and repeat, working around the shower’s piping and flanges. In hindsight, we should have turned off the water and taken the shower pipes off, but we worked around them.

See where I stopped painting? That’s where the edge tile is coming into play.

Joe cut a bunch of these small square tiles down to size between the shower and door frame. This was probably his most time consuming step.

I got to help put in these spacers. This keeps the tiles looking uniform and leaves room for the tile grout.

Which brings us to the next step. Grout time! After that dried, we needed to seal the tile, making it water (and mold) resistant!

Working all the way around, we then sealed it with a tile sealant. The roommates weren’t too happy when they learned the shower was off-limits for the next two days while this properly dried.

But I think all was forgiven when it was done.

It really cleans up after washing all the extra dust and adding caulk. The edge tile were kind of chalky when we bought them, but look a lot brighter now!


Just one last photo, because I just can’t get over how rustic/fresh/clean it looks.
How bout you? Looking to retile your shower? Redo your bathroom?
4 comments